This step completes the stitched image by marking it as a panorama.
We have to be very careful here to compute and enter the correct values
because this defines the panoramic coordinate system of the final image.
If the values are incorrect, subsequent perspective cropping and/or
conversion to VR formats (QTVR, PTViewer, IVR) may produce less satisfactory
results.
-
Double-click the thumbnail of the final rotated
image to make it the current image. Actually, if you have not
clicked anything on The Panorama Factory’s window, the final rotated image
should already be the current image.
-
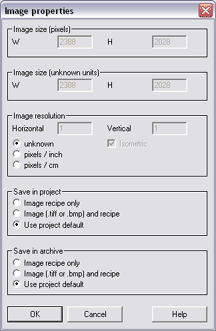
Choose the
Properties command (Image
menu). Write down the W and H values from
Image size (pixels) in the Image properties dialog box.
We'll refer to these values as StepF_W and StepF_H. In our example,
these values are 2388 and 2028. Click Cancel
to close the Image properties dialog box.
-
Choose the
Panoramic properties command (Image
menu).
-
Select This is a panoramic image
and Spherical projection under
Panoramic image.
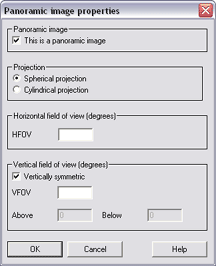
-
Compute the horizontal field of view:
HFOV = StepF_W * StepA_HFOV / StepA_W
Enter this
value as HFOV under Horizontal field of view (degrees).
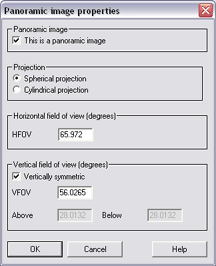
In our example, the value is:
HFOV = 2388 * 61.9387 / 2242
HFOV = 65.972
-
Hit the Tab key on your keyboard to
complete the HFOV value. This will cause The Panorama Factory
to calculate the total vertical field of view and display it as VFOV
under Vertical field of view (degrees). Write this value
down. We'll refer to it as StepF_VFOV. In our example, this
value is 56.0265.
-
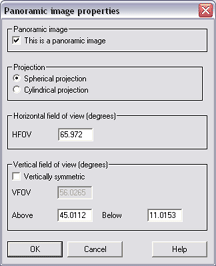
The Panorama Factory assumes
that the panorama is symmetric above and below the horizon, which is not
usually true for this type of panorama. So we have to correct the
vertical field of view to be asymmetric. Remove the checkmark from Vertically
symmetric under Vertical field of view (degrees). This
will let us enter individual values values for the field of view above and
below the horizon.

-
Enter the StepAB_Below value as Below
under Vertical field of view (degrees). In our example, this
value is 11.0153.
-
Compute the field of view above the horizon:
Above = StepF_VFOV - StepAB_Below
Enter this
value as Above under Vertical field of view (degrees).
In our example, the value is:
Above = 56.0265- 11.0153
Above = 45.0112
-
Hit the Tab key on your keyboard to
complete the Above and Below values. This will cause
The Panorama Factory to recalculate the total horizontal and vertical
fields of view from Above and Below. These should be
very close to the StepA_HFOV and StepF_VFOV values. If they're very
much different, recheck all of your calculations.
-
Click OK.