Step G -- Crop the image
In this step, we crop the rotated image to remove extraneous white space.
If we want to, we can simultaneously flatten the perspective.
-
Choose the
Crop command (New image menu).
-
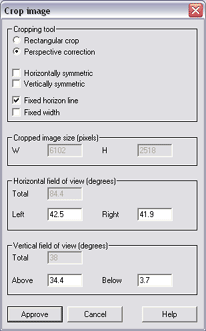
Set cropping parameters as you wish, or keep
the defaults. If you have gotten everything right, the
Perspective correction option should create a conventional image that
preserves straight lines. You should not use perspective
correction if you plan to display the image in a VR viewer.
-
Drag the boundaries of the cropping region to
enclose the part of the image you want to keep.

-
Click Approve.
-
Note that we allowed the
cropping area to include a little bit of the white background at the upper
left corner of the image. It is not unusual for a hand held panorama
to have a missing piece like this because it's difficult to be completely
consistent in photographing the rows. We'll fix this later with
Photoshop.
Advance to Step H --Sharpen the image if desired
Back to Step F -- Assign
panoramic properties to the rotated image
Up to The list of the
major steps
top
|